How To… | Sharing Permissions in Office 365
Ensuring your sharing options and permissions are correct in 365
Office 365 offers a number of products to help you share information with other people. It’s important that this is done in the right way to ensure your files are secure and can only be accessed by the right people. Teams, OneDrive and SharePoint all share this system of Access and Permissions management, so the advice below can be applied to all.
It is worth regularly checking what permissions you have set up on your Teams sites and shared OneDrive folders (particularly those which contain sensitive information). The guidance below will help you to understand the correct way of sharing data across Microsoft Office 365 products, while ensuring the minimum risk of sensitive information being seen by unwanted audiences.
Contents
Teams
Permissions in Teams are set when you create your Team.
Once you’ve chosen the type of Team you’d like to create, you can set the privacy level you’d like your Team to have:
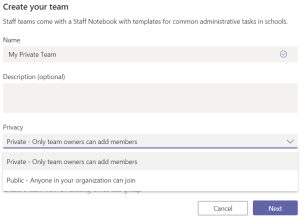
In a Private Team: You add team members, and members can see all conversations, files and folders in that Team. Teams are created as private by default.
Note: If you invite any user to a private Team, all previous conversations, files and folders will be visible to them – so be cautious when inviting external guests to Teams containing sensitive or personal data.
In a Public Team: Anybody from around the University can add themselves to your Team. Once they’ve joined, they can see all conversations, files and folders in that Team.
Top Tips
- Make sure you don’t use any sensitive information in your Team Name. Teams are linked to Groups, which can be searched for (see SharePoint tips below).
- Your Teams Privacy setting can be seen at the top right of the screen.
- If you’re a Team owner, you can change privacy settings by clicking the icon next to your Team’s name, then clicking “Edit Team”.
OneDrive
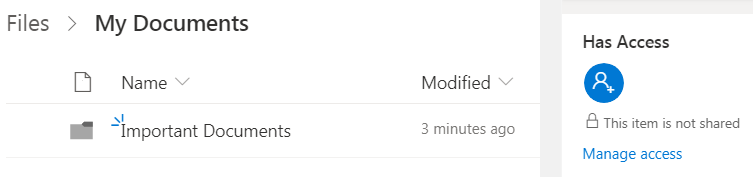
OneDrive files and folders are not shared by default. This means that when you add a new file or folder to your OneDrive, nobody else will be able to see it unless you add a file into a folder that is already shared.
![]()
You can see who has access to a file or folder by clicking the “…” icon, and clicking “Details”.
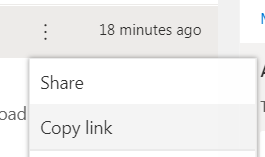
![]() To share a file or folder, hover over the file or folder name, and click the share icon.
To share a file or folder, hover over the file or folder name, and click the share icon.
Within the desktop OneDrive folders, right-click on the file or folder name and select “Share”.
Doing this will allow you to share a link with a chosen individual, or group of people.
Click the top box to choose who a link to your file or folder is shared with. It’s important to make sure that only people who need access to the file or folder receive access, and nobody else.
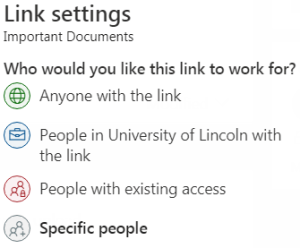
How can I tell who can see the contents of a link?
The table below explains the options in Link Settings in more detail,
| Who would you like the link to work for? | Who can access the content? |
| “Anyone with the link” | Anybody who can click the link, including external users (not suitable for sharing sensitive information/personal data). Once created, the link can be shared with anyone in the world to view. |
| “People in the University of Lincoln with the link” | Any staff and students who can click the link. The link can be shared, but only users with University Accounts can access it. |
| “People with existing access” | Anyone who already has access to the file or folder. You can check this via the “Has Access” screen (see below). |
| “Specific People” | Specified users and individuals. For example a single, named user. Best for sharing highly sensitive information with a specific colleague. Nobody else will be able to access it, unless specified by you on the “Manage Access” screen. |
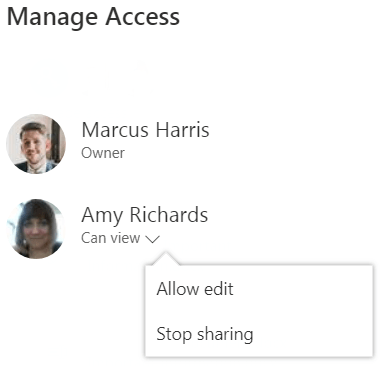
Once you’ve chosen who to give access to, they will appear on the “Has Access” list. You can change their access level or remove their access altogether by clicking on “Shared” in the “Sharing” column and changing settings in the “Manage Access” window.
You can also create a standalone link to share by clicking “Copy link”. Doing this will create a link that can be copied and sent to people.
This link can only be used by people depending on the level of access you have set in the Link settings. You can remove access via this link completely in the “Manage Access” section.
Creating a File Request
In some instances, you may wish to setup an area for users to upload files, which can only be seen by you – similar to a submission.
With the file request feature in OneDrive, you can choose a folder where others can upload files using a link that you send them. The users that you request files from cannot see what’s in the folder – they can only upload files to it.
For information on how to do this, take a look at the Microsoft help page here
Top Tips
- If you give somebody access to a folder, they will also have access to any files in it, even if these files are added after access is given, so be careful which files you add into shared folders.
- Review the access rights given on a regular basis to make sure nobody has access if they do not need it.